Appetizers, Breakfast Dishes, Capsicum, Sandwiches, Uncategorized

Bombay Sandwich

If you have been to Mumbai aka Bombay, then you have most likely not missed this Indian street delicacy. Indian street food is a classic experience on its own, cheap, delicious and quick, the three factors that make street food so popular in India. Not to mention every state and every city boasts of its own delicacies…Chole kulche and the chaats of Delhi, Jhaal muri, Puchkas and Kolkata Egg rolls of Kolkata, Pohe, Jalebi and Kachoris of MP and Rajasthan, Kotthu Parota and Idlis of Chennai, Masala Dosas, Masala Puri and Akki Rotti of Bangalore and the list goes on and on. The list is endless actually 🙂

Mumbai, I would say started out as the capital of street food. There are the chaat varieties such as bhel puri, dahi puri, kachori, dahi puri and sev puri, the vada pav and pav bhaji, the kebabs and chicken tikka rolls, the sandwiches and endless list of milk shakes.

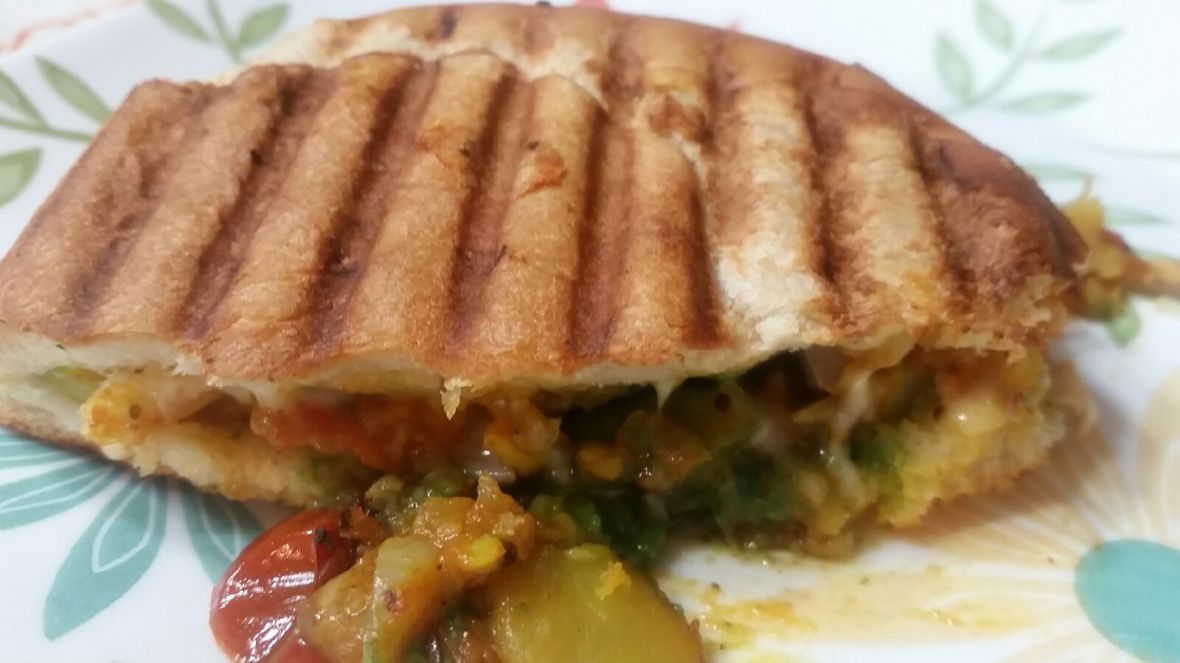
A long time back when I had visited Mumbai for a small medical procedure at Nanavati hospital I stayed with a family friend of ours. It was a longer stay than a typical vacation. On a cool breezy evening I remember going out shopping and stopping to grab a bite somewhere near the VT train station. That was my first experience of this amazingly delicious fresh veggie sandwich. What’s more, the sandwich wallah bhaiyya (brother who made sandwiches) was kind enough to customize my sandwich for me. Ever since I have eaten this sandwich multiple times, but somehow that first experience still stays fresh in my mind.

Recreating this magic today in my kitchen, far away from Mumbai 🙂

DSC_0022
Delicious Bombay Veggie Sandwich

You will need:
2 Slices of Bread (Here I have used wheat bread, you can use a bread of your choice, white sandwich bread works best)
Butter for toasting
Green Chutney
Tomato Slices
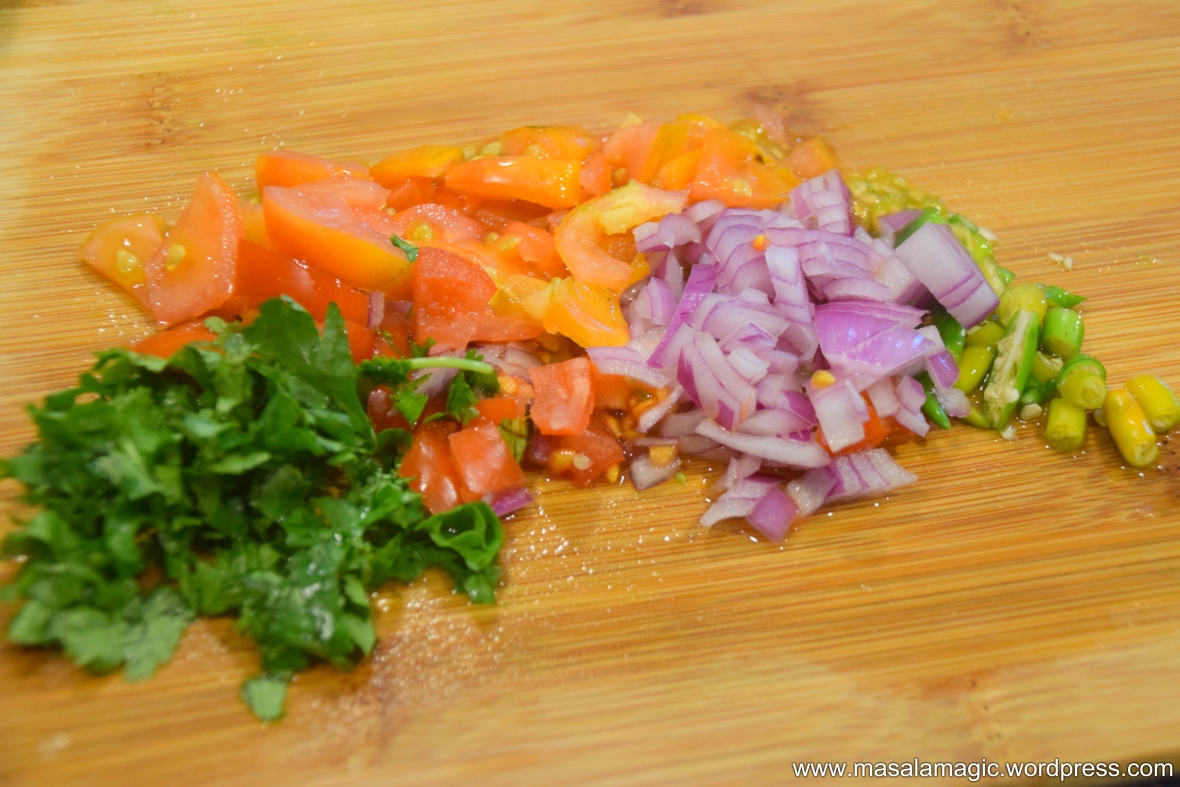
Bell Pepper or Capsicum Slices
Potato Slices (Boil the potato, peel and slice into thick slices)
Cucumber slices
Onion slices
Chopped cilantro or coriander leaves
Salt and pepper to taste
Sev for garnishing

Method:
The pictures are self descriptive. Once you have the green chutney ready and the veggies sliced, all it takes is 5 minutes to put it together.

For the green chutney:
Green Chutney – Combine 1 bunch of Mint leaves, a handful of Spinach leaves, 1 bunch Cilantro, 1 medium tomato, 1 small onion, 1 small Garlic(optional), 15 to 20 green chillies, ginger and salt to taste. Blend into a smooth paste and keep aside. This green chutney stores in the refrigerator for atleast 1 week.

1. Butter the insides of 2 slices of bread and spread the green chutney evenly on the insides. Layer tomatoes and cucumbers.

2. Then layer with, sliced bell pepper, boiled potato slices, onions and chopped cilantro.

3. Close with the other slice, spread some butter or ghee on the top of the sandwich and toast in a panini press or a sandwich maker. If you don’t have either gadget you can toast on a griddle or tava. Toast both sides until golden brown.

4. Serve hot topped with sev and ketchup (optional).

Simple and delicious Bombay sandwich, great for an evening snack or dinner is ready!!

DSC_0018

Happy cooking all!!

Found this interesting article called “A day in the life of a Mumbai Sandwichwallah“. It’s amazing how hard people work. You will never see this kind of customer service and business precision in any large corporation!! Hope you enjoy reading this article!

Also, you might like other sandwich recipes on my blog:
Grilled Veggie Sandwich
Iyengars Bakery Style Sandwich
Paneer and Potato Paninis

Thank you for visiting.


Indian Food, Indian Rice Dishes, Main Course, Rice, Rice Dishes, Rice Entrees, Uncategorized

Methi Cauliflower Rice

This simple, flavorful Biryani style rice is super easy to make and great for a hurried weekday lunch or dinner. Of course, this recipe came about while I was trying to finish up some fresh methi leaves and cauliflower that was lying in my refrigerator!

DSC_0226

 You will need:
1/2 to 1 cup Fresh Methi or Fenugreek leaves – This is optional, but the methi adds a very wonderful flavor to the rice; Wash and chop
Rice – 2 cups (I used Sona masoori, you may use Basmati too)
2 medium sized Onions – Peel, Wash and Chop
3 to 4 green chillies – Slit or coarsely mash in a mortar and pestle
Garlic – 3; Peel and mash roughly
1 Tomato – Wash and Chop into cubes
Cauliflower – 1.2 head; Break into florets, wash and blanch in hot water; Drain and keep aside
Salt to taste
3 tbsp Oil

Dry Powders:
1 tsp Turmeric Powder
1 tsp Red Chilli/Dhaniya Powder or Curry Powder
1 tsp Dhaniya powder or Coriander powder
1/2 tsp – Garam Masala (I used a homemade powder of roasted cinnamon, cloves, elaichi and mace)
1 tsp Pav bhaji masala

Method:
1. Wash the rice and cook in an electric cooker. I use the ratio 1 cup Rice to 2.5 Cups water for Sona Masoori Rice or 1 cup Rice to 1.5 cups water for Basmati Rice. While the rice is cooking you can prep all the other ingredients.
2. In a saucepan, bring 4 cups water to boil. Break the cauliflower into medium sized florets, wash and put it into the saucepan with boiling water. Add about 1 tsp salt to this water. Cover with a lid for about 5 mins. Drain. Keep aside.
3. Chop the onions, tomatoes, crush the garlic and green chillies and keep aside. Wash the methi leaves and chop and keep aside.
4. In a pan, heat 3 tbsp Oil. Add a small piece of cinnamon, 2 to 3 cloves, bay leaf and saute. Add the chopped onions, garlic, methi leaves and green chilli and fry until the onions are golden brown.


5. Add the chopped tomatoes, the dry powders and 1/2 tsp salt and saute until the tomatoes are mushy and the mixture is oily. At this point add the garam masala powder and mix well.


6. Add the blanched cauliflower and mix well. Add about 1/2 cup water close with a lid and cook for about 5 minutes until all the water evaporates.


7. Add the cooked rice at this point, salt to taste and 1/2 tsp garam masala powder. Mix well. Then add the pav bhaji masala powder and mix well.


8. You can add 1 tsp ghee at this point for flavor. Garnish with chopped cilantro and serve hot.

DSC_0212.JPG

DSC_0216.JPG

Hope you enjoyed this recipe!! Thanks for stopping by.


Chutneys and Powders, Uncategorized

Peanut Chutney Powder

“OMG! Ma where is the chutney powder?” And I somewhat listless, half listening “hmm in that box there…” and she goes “What? It is over! When are you going to make some? What I am going to eat this dosa with now?” and now I am paying attention ’cause she has started to complain…”Oh Ok, I will make it soon”….
And a week goes by and then two and now she wants chutney powder on her toast..and the third week and she wants it on her tortilla!! And “You still have not made it!!”
After all the complaining, I finally get down to the task of making it!! That’s my younger daughter who is so fond of this stuff, that she will eat it with anything and everything…
Somehow while growing up, having this peanut chutney powder at home was a given for granted, we pretty much ate it with everything..idli, dosa, chapathi, rice, bread, just about anything…So this is a family recipe. And a must have in my home. It is delicious and very simple to make…

DSC_0057

DSC_0067
Yummy Idlis tossed in Peanut chutney powder and Sesame oil.

You will need:
Channa Dal – 1 cup
Urad dal – 1 cup
Dry Red Chillies – 2 cups (1 cup Byadgi chillies, 1 cup Guntur Chillies)
Peanuts – 1/2 cup
Sesame Seeds – 1/2 cup
Hing – 1/2 tsp
Tamarind – 1 small lime sized ball
Curry leaves – a handful
Salt to taste
Copra or Dessicated coconut – 1/2 cup (you cannot replace with fresh coconut; if you don’t have any, omit it)

Method:
1. Dry roast the Peanuts in a non stick pan on medium heat until golden brown. Do not burn the peanuts, that usually changes the taste of the peanuts and makes them bitter. Transfer to a plate and cool.
2. In the same pan, roast the channa dal with a few drops of oil on low-medium heat until golden. Transfer to a plate and cool.
3. In the same pan, roast the urad dal with a few drops of oil on low-medium heat until golden. Transfer to a plate and cool.
4. Roast the dry red chillies, curry leaves, tamarind and hing with a few drops of oil until the chillies are slightly roasted. At the end, add the grated copra or dessicated coconut and toss and then Transfer to a plate and cool.
5. Dry roast the sesame seeds in the same pan until they pop. Transfer and cool.
6. Allow all roasted ingredients to cool. Meanwhile, remove the skin of the roasted peanuts and keep them ready.

24138895979_fc89e60916_c
7. In a dry blender or a food processor (or a mixer) grind the red chillies, tamarind, sesame seeds, salt, copra, curry leaves and hing until somewhat smooth.
8. Then add the remaining ingredients and dry grind until a somewhat smooth (slightly coarse powder).
9. Spread on a large plate or tray, cool and then pack in an airtight container.
10. Keeps for atleast a month.

Serve with idlis, dosas, inside a chapathi roll, on bread toast or even as a topping on upma/poha etc.

Enjoy!


Appetizers, Breakfast Dishes, Capsicum, Sandwiches, Uncategorized

Grilled Cauliflower Veggie Panini

A cold wintry day in my part of the world today!! This morning took me by surprise..I had not watched the weather so I did not know it was going to snow!! But what is Christmas without the snow!! Christmas ain’t any fun when its not white! Here’s how it looks now in my backyard 🙂

ChristmasSnow

ChristmasSnow2

So a cold wintry day such as this calls for something hot!! How about these yummy delicious Grilled Cauliflower Paninis..so easy and delicious.. this came about when I got a recipe idea from an instagram friend @kalpanasareesh. I had some leftover cauliflower potato rassa/curry that i transformed into a grilled cauliflower stuffing for this recipe. This was a couple of weeks back and it was a super hit at home, so this time I made it again from scratch with making the cauliflower and then grilling it!

CauliflowerPanini1

You will need:
For the Cauliflower/Potato Rassa:
1/2 head Cauliflower – Break into tiny florets and wash thoroughly in hot water
1 large Potato – Peel, wash and cube
1 Small onion – Peel, wash and chop fine
1 Medium Tomato – Wash and chop into cubes
1 Green chilli – Chop fine
2 pods garlic – Peel and mash
1 small piece Ginger – Peel and grate
Dry Powders:
1 tsp Dhaniya Powder
1/2 tsp Curry powder or Red chilli powder
1 tsp Pav Bhaji masala/Chole masala (whatever is handy)
Salt to taste
Oil and cumin seeds for seasoning

Method for Rassa:
In a pan, heat the oil. Add the cumin seeds. Then add the onions, green chillies, ginger and garlic and saute for about 3 minutes. Add chopped tomatoes (you can alternatively puree the tomato), salt and saute until tomatoes are mushy. Add the dry powders and fry for a minute. Then add the chopped cauliflower and potatoes. Add more salt if needed, 1/2 cup water, cover and cook until almost dry. Allow this rassa to cool. The best part is you can use any leftover cauliflower sabji for this recipe.
Spread this cauliflower potato rassa in a baking dish or cookie tray and grill in the oven for about 15 minutes at 350 degree F. If you cannot grill in the oven you can even roast until slightly charred in the pan itself. I love the grilled taste.

To Assemble the Paninis:
You will need:
Bread of choice – I have used French Baguette
Green chutney (optional) – Recipe here
Sliced cucumbers
Sliced Bell Pepper/Capsicum
Sliced/Chopped Onions
Sliced/Chopped Tomatoes
Chopped cilantro/Coriander leaves
Grated Cheese (I have used grated Havarti cheese, you can use whatever is available)

1. Slice the bread in half. Spread green chutney on the insides/optional you can spread butter.
2. Layer with cucumbers, bell pepper slices, tomatoes.
3. Spoon the grilled cauliflower potato mixture on the slice.
4. Top with chopped onions and more tomatoes. Sprinkle some chopped cilantro.
5. Sprinkle grated cheese. You may even add some mayo if you like.
6. Cover with the other half.
7. Grill in a panini press or on a hot griddle. If grilling on a hot tava/griddle, you can press with a large plate on top until well pressed. Use butter if you want for grilling.
8. Serve hot!!

CauliflowerPanini2

12243418_1671911053078067_7638105337739280032_n

Hope you enjoyed this wholesome, delicious hot Cauliflower paninis!!

Merry Christmas and Happy Holidays!!

Appetizers, Miscellaneous, Uncategorized

Chennai Chipotle and Chef Yogi

On my blog today, I would like to make a special introduction to Chef Yogi. Chef Yogi is a passionate cook who whips up these innovative dishes in a jiffy!! Chef Yogi wanted me to keep him anonymous, so I gave him a pseudo name, but due credits should go where they are deserved 🙂 A long time friend and connoisseur of good food, Chef Yogi  dishes out yummy scrumptious meals for his family and friends on a regular basis. After much begging on my part :-), Chef has agreed to be a regular contributor on my blog here! So Yay!! Please join me in welcoming Chef Yogi’s first post!!

Today in the Masalamagic kitchen, he is sharing his famous “Chennai Chipotle” recipe..Easy to put together and delicious, he says that this recipe is “A Mexican Dish with a twist”!!

IMG_2883

You will need:
Guacamole,
Black Beans,
Diced Tomatoes,
Cilantro,
Green Chilies (or Jalapeño),
Basmati Rice,
Grilled Veggies (used frozen stir fry veggies from Costco),
Chilli powder
Mexican seasoning,
garlic salt,
Sour Cream (or Home made Yogurt).

IMG_2859

IMG_2874

Chopping:
Finely dice Tomatoes and green chillies. Cut veggies if you use fresh ones.

IMG_2881

Grilling:
Takes about 20 Min – 30 Min depending on the oven and amount of veggies.

IMG_2875

Cooking:
Cook Basmati Rice add finely chopped cilantro and squeeze fresh lemon to taste. Microwave the Black beans, Corn for 2 min.

Preparing the Cilantro rice:
Add finely chopped cilantro and some lemon juice to the rice. Add salt if you like but it is not necessary. Mix well.

In his own words “The good part about this dish is no mess and quick to prepare. The time consuming activity here is the grilling and cooking the rice. This can be done in parallel and with minimal attention. During that time cut the tomatoes, onions and green chilies. Microwave the corn and black beans for 2 min each. Add seasoning to the veggies (I like garlic salt and chill powder). You can also add Mexican seasoning.”

Serving:
BURRITO BOWL!
Two scoops of cilantro rice, add cooked black beans, corn and veggies. Top it with Guacamole, Salsa, and Sour cream. If you like lemon, add that to the salsa. Blue corn chips would be another great addition, if you like it crunchy.

IMG_2876

Enjoy a scrumptious Chennai Chipotle Burrito Bowl by Chef Yogi!!

IMG_2883

Thanks for stopping by.

Indian Food, Indian Rice Dishes, Karnataka Dishes, Rice, Rice Dishes, Rice Entrees, Uncategorized

Dill Chitranna

“Chitranna” is the Kannada term for “Mixed Rice”. Typically every home in Karnataka makes some variety of Chitranna. Of course, our home was no exception. I loved eating lemon rice or lemon chitranna and can still say that it is one of my favorite rice dishes. Simple, tasty and a no fuss recipe. Many roadside restaurants in Karnataka serve some form of Chitranna on their menu on a daily basis. I have some random memories associated with most dishes. One time, I had made a trekking trip to “Ramnagaram” a small town on the outskirts of Bangalore on the way to Mysore. Just before we did some rock climbing and trekking our group stopped at this roadside little restaurant to grab a quick bite. On the menu was tasty Chitranna served with some spicy coconut chutney. For some reason, that balmy day, the lemony chitranna and spicy chutney is still fresh in my mind!!
Today from the Masalamagic kitchen I will share with you two simple Chitranna recipes – Chitranna with Dill leaves (Sabassige soppu chitranna in Kannada) and Tomato Chitranna.

Chitranna with Dill (Sabassige Soppu Chitranna)

DSC_0048-002
You will need:
1 cup cooked rice
1 cup Fresh Dill Leaves – Remove all stalk, wash and chop fine
1 Medium Onion – Chop fine
4 Green Chillies – Slit lengthwise
a few curry leaves
1 tbsp Grated coconut
a few sprigs Cilantro or Coriander leaves chopped
Salt to taste
Juice of 1/2 a lime
2 tbsp Oil for seasoning

For Seasoning:
1 tsp mustard seeds
1 tsp Channa Dal
1 tsp urad dal
1/2 tsp Cumin seeds

Method:
1. Cook rice in a rice cooker. I use the ratio 1 Rice: 2.5 cups water for Sona Masoori Rice. You may even use Basmati.
2. Once the rice is cooked, spread in a mixing bowl or platter. Add salt and the lime juice and allow to cool.
3. Meanwhile chop all ingredients as mentioned above.

4. Heat a pan with oil. Season with mustard seeds, cumin seeds and dals. Once the dals turn golden brown add the chopped onions, green chillies and curry leaves. Add 1/4 tsp turmeric powder and saute until light brown on low-medium heat (about 2 minutes).
5. Then add the chopped dill and mix well. Fry for a minute. Then add the grated coconut and chopped coriander/cilantro and mix well. Turn off the stove. Add this mixture to the cooked rice and mix well.

6. Serve hot.DSC_0040-001

Tomato Chitranna

DSC_0623
You will need:
1 cup cooked rice
1 Medium Onion – Chop fine
1 Medium Tomato – Chop into fine cubes
4 Green Chillies – Slit lengthwise
a few curry leaves
a few sprigs Cilantro or Coriander leaves chopped
Salt to taste
2 tbsp Oil for seasoning

For Seasoning:
1 tsp mustard seeds
1 tsp Channa Dal
1 tsp urad dal
1/2 tsp Cumin seeds

Method:
1. Cook rice in a rice cooker. I use the ratio 1 Rice: 2.5 cups water for Sona Masoori Rice. You may even use Basmati.
2. Once the rice is cooked, spread in a mixing bowl or platter. Add salt and allow to cool.
3. Meanwhile chop all ingredients as mentioned above.

DSC_0609
4. Heat a pan with oil. Season with mustard seeds and dals. Once the dals turn golden brown add the chopped onions, green chillies and curry leaves. Add 1/4 tsp turmeric powder and saute until light brown on low-medium heat (about 2 minutes). Add chopped tomato, turmeric powder and saute for few more minutes until the oil leaves the sides.

5. Add this mixture to the cooked rice and mix well. Check for salt and adjust if needed. Garnish with chopped cilantro/coriander leaves and mix.
6. Serve hot.DSC_0619

Thanks for stopping by 🙂

Breakfast Dishes, Uncategorized

Oats Pongal

So with all the buzz on whole grains and eating right it does put a lot of pressure on us moms and chefs in the kitchen to ensure a healthy, balanced and yet delicious meal for the family! I always argue with my husband that our ancestors ate white rice all the time and did just fine. But the truth is, in today’s world our sedentary lifestyle is much unlike the hard physical work that our ancestors did. Not to mention that the white rice we get today is super polished and stripped of all its nutrients and fiber. We are in the world of plastic mixed with rice!! And god knows what other surprises! Feeding our families right is definitely a challenge today!
In an effort to eat healthy, here I am sharing with you a recipe for Oats Pongal. To be honest, it took me a long time to get used to the sticky texture of oats. But once you start eating it enough, you will actually begin to like it and even enjoy it. And this recipe is a great way to start if you like South Indian food and prefer Savory to sweet for breakfast!! Of course, this recipe is great for dinner too.

DSC_0023

You will need:
Quick Oats – 1/2 cup (I have used whole food brand quick oats, you can use Quaker or any that is available)
Moong Dal – 3 tbsp
1 tsp Cumin seeds
1/2 tsp Black Pepper
1/2 tsp grated fresh ginger (missing here since i ran out of ginger at home 🙂 )
a few curry leaves
1/4 tsp Hing or Asafoetida
Salt to taste
1 tsp Olive Oil (Alternatively you can use 1 tsp Ghee if you like)
a few pieces of Cashews (I have not used here, but it definitely adds taste to Pongal)

Method:
1. In a pan, bring about 2 1/2 cups water to a rolling bowl. Add the washed moong dal and allow to cook in open pan for about 15 minutes until the dal is fully cooked. You will the grains split. See below. Once the dal is cooked, keep aside. Do not throw the leftover water from the dal.
2. Meanwhile, in a mortar pestle coarsely powder the cumin and pepper. If you don’t have one, powder in a coffee grinder or mixer.

3. In a pan, heat the oil (or ghee). Add the coarsely ground cumin and pepper powder, hing and curry leaves and saute for a minute. At this point you may add grated ginger and cashews and fry. Then add the quick oats and mix well. Add salt and fry for about 1 minute.

4. Then add the cooked moong dal with all the water that is left in the dal. Add about 1/2 to 1 cup water if needed. Close and cook for about 5 minutes on a medium to low flame.

5. Open the lid and cook for 2 more minutes. Ensure that most of the water evaporates.

6. Hot and delicious Oats Pongal is ready to be served.

DSC_0025

Your protein rich, fiber rich Oats Pongal for a great start to the day!!

DSC_0026

Thanks for stopping by!!